Using a Spreadsheet to Run a Business
Scenario 1
You have decided to become rich by opening a computer supplies shop in the school. You want to use a classroom to sell items like disks, CDs and ink cartridges at lunchtime. The school has agreed to allow you to do this but they want you to pay them £50 per week to rent the classroom! You have decided that the business will only be worth your while if you manage to make £40 per week. |
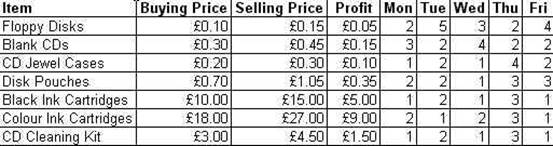
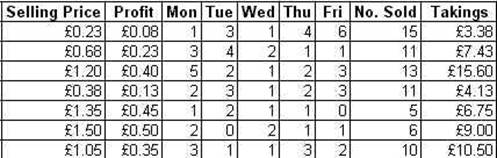
1. Create a table and enter the sales figures for your first week's business, as follows:
2. Answer the following questions:
- What is the state of your business?
- What is your most popular product?
- What is your least popular product?
- What is the most profitable product?
- What is the least profitable product?
- What is your busiest day of the week?
- What is the quietest day of the week?
- Why is the most popular product not the most profitable product?
- What does the spreadsheet tell you when you make less than £40?
- What does the spreadsheet tell you when you make less than nothing?
3. Spreadsheets can be used to answer "What if . . ." questions. Try using the spreadsheet to answer these questions:
- What would happen if you got a bulk order for 20 colour ink cartridges on Monday?
- What would happen to your business if the school raised your rent to £100?
- What would happen if the price of disk pouches increased to £1.00?
4. If you were running a computer supplies shop, do you think this spreadsheet would be helpful to you? If so, why?
Scenario 2
You have abandoned the computer supplies game. You think the real money is to be made selling school stationary supplies! The school is going to charge you £20 per week in rent. You will abandon the business if you fail to make £25 per week. Your first task is to set up a spreadsheet model for this new business. |
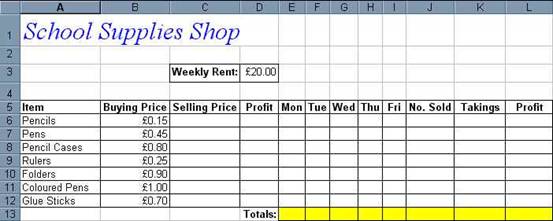
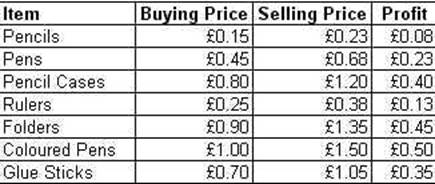
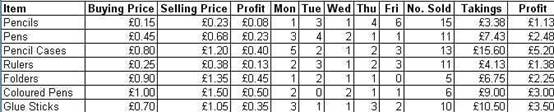
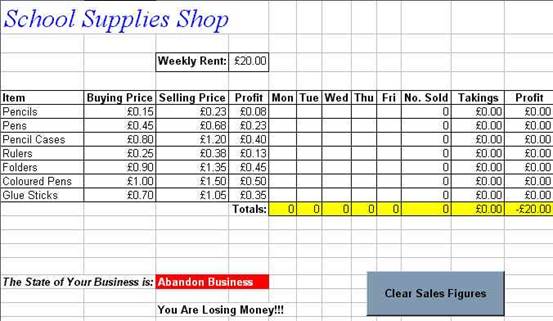
1. Use Excel to set up a model for your School Supplies business. Make it look something like this:
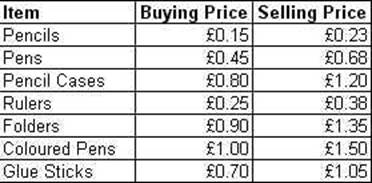
2. You have to set a selling price for each item. You decide that you will sell each item for 50% more than you paid for it. The formula for this is:
Selling Price = Buying Price * 1.5
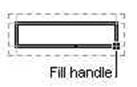
Enter the correct formula to show the selling price for pencils and then drag the Fill Handle down to enter the formula for the other cells.
|
|
|
3. Fill in the Profit column. The profit on each item is the difference between the buying price and the selling price. The formula would be:
Profit = Selling Price – Buying Price
Again, enter the formula for pencils and then drag the Fill Handle down.
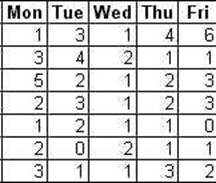
4. Now enter your first week's takings:
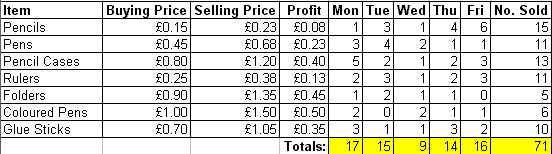
5. You now want to add up the total items sold per day and the total number of each item sold per week. Because these are simple addition sums, you can use the AutoSum button:
![]()
Your spreadsheet should now look something like this:
6. Now we will fill in the Takings column. The money taken by the shop will be:
Takings = Selling Price * Number of Items Sold
7. This leaves you with the final Profit column. In this column, you are performing the following calculation to work out the profit you have made for each item you have on sale:
Profit = Profit Per Unit * Number of Units Sold
8. You still have two Total cells to fill in. The total of Takings should be easy to fill in with the AutoSum button.
![]()
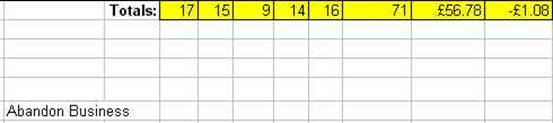
9. The Total Profit is slightly more complicated because you have to remember that you have to pay the Rent! The total profit will be:
Total Profit = Profits for each item – Rent
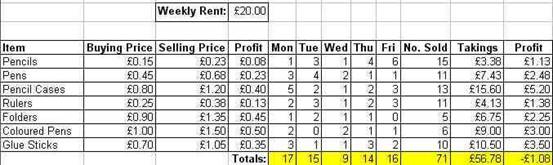
You will be alarmed to see that, on the example above, you are losing money!
10. Remember, you want profits of at least £25 per week from this business and you definitely don't want to lose money.
You will set up two Alert Notices on your spreadsheet to indicate the state of your business.
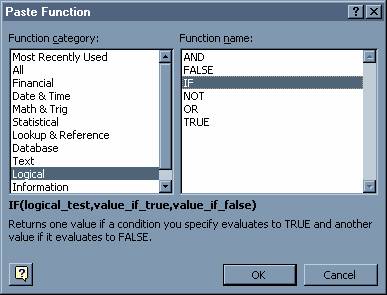
Click in a blank cell and click the Paste Function
button: ![]()
Select the IF function from the Logical category:
You will have to enter a Logical Test to determine when your spreadsheet is going to give you a profits warning:
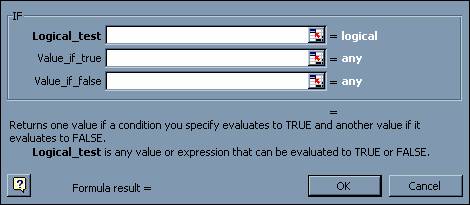
You want to run the following test:
The Test is
whether my profits are at least £25
If this is the
case, I want a warning displayed that reads "Things Are Fine"
If I don't make
£25, I want a warning displayed that reads "Abandon Business"
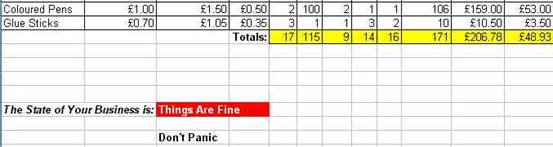
You should get something like this:
Let's imagine that someone makes a bulk order for 100 packs of coloured pens on Tuesday. Enter this sale and suddenly your business now looks much more healthy:

11. The second alert will warn you when your business makes a loss. You are "making a loss" when your business is making less than nothing. Therefore, the Logical Test is as follows:
The Test is whether I make less than £0
If this is the
case, the warning should say "You Are Losing Money!!!"
If this is not the
case, the warning should read "Don't Panic"
12. Add formatting and text labels to improve the appearance of your spreadsheet, as in the example below:
Experiment with your spreadsheet and watch the messages change.
If the order for 100 packs of coloured pens is withdrawn, you will be told that you are losing money and you should abandon the business!
13. Every week you will enter new sales figures, so you would like a button to clear the data from the previous week. To do this, you will have to record a Macro. First you need to Record a New Macro:
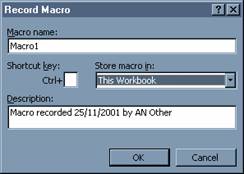
Once the macro is recording, you need to select all the sales figures and press Delete. Then stop the recording of the macro.
ImportantOnly delete the items sold on each day. Don't delete any formulae! If you delete something by
accident, press the Undo button |
To draw the button, you need to view the Forms Toolbar. You will find this in the View menu.
Once the button is drawn, you will be asked to assign your macro to the button. Once you have done that, the button should work.
Remember, you can edit the text on the button, make it bold, change its colour, etc. Your final spreadsheet should look something like this:
14. As a finishing touch, it would be a good idea to add some security to your spreadsheet to make sure that the formulae you have done is not deleted by mistake.
It is easy to password-protect a spreadsheet. This means that nothing on the spreadsheet can be changed unless a password is supplied. This is no good to you because there are some cells that you will want to change. You want to be able to add new sales figures each week and you also want to be able to change the rent; just in case the school decide to increase the money they are charging you.
First select the cells where the sales figures will be entered each week and choose Format Cells from the Format Menu

Choose the Protection tab and remove the tick from the Locked box.
Do the same for the Rent cell.
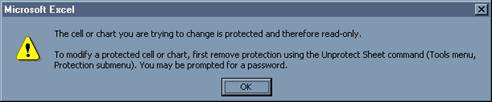
Once these cells have been unlocked, you can Protect the sheet:
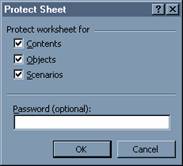
You should now find that you can't change the formulae. If you do, you get the following message: